Find the first wet spot
A puddle beside your hose does not automatically mean the whole hose needs replacing. Water can travel along the outside before it drops, so start with the highest wet connection and work toward the ground.
Choose a dry moment when you can see what changes as the water comes on. Move electrical equipment out of the wet area, and keep the walking route clear before you begin.
Disconnect a sprayer or sprinkler so you can separate its connection from the hose itself. Lay the hose where you can follow it without stepping over furniture or pulling it across sharp edges.
You are checking ordinary removable garden equipment here. A leaking wall fitting, a split indoor pipe, or water emerging from the house calls for a different repair and, when necessary, a qualified plumber.
Take one photograph before you change anything. It gives you a useful reference for the original connection order and helps you avoid buying a replacement part from an unreliable memory.
Make a small leak map
Turn the faucet on gradually while you stand clear of the outlet. Watch the faucet connection first, then any timer, splitter, hose joiner, and the final attachment.
A short strip of removable tape beside a suspect spot can help you remember it after everything is turned off. Avoid covering the actual leak, since you still need to inspect the surface beneath it.
Describe what you see rather than immediately naming the cause. Water dripping from a coupling, a fine spray through the hose wall, and a loose fitting that rotates inside the hose are different problems.
If several connections are wet, dry their outside surfaces with a cloth and check again. Deal with the highest active leak first, because its runoff can make a sound connection below look faulty.
Keep the first test short. You need enough water to locate the problem, not a newly flooded planting bed that makes every later observation harder.
Turn off and release pressure
Close the faucet fully before you loosen a connection. Open the hose-end nozzle away from people and release the trapped water so you are not working against pressure.
If a timer is installed, follow its instructions for shutting down and removing it. An automatic program can otherwise reopen the valve while you are holding the disconnected hose.
Set small parts in a shallow tray or an old container. A dark rubber washer is surprisingly difficult to find after it falls into mulch or a thick lawn.
Remove a coupling by holding the parts intended to turn, rather than twisting the hose into a spiral. If corrosion or damage makes a fitting stubborn, stop before your effort starts turning the wall fitting itself.
Check the equipment instructions before reaching for pliers. A plastic timer housing and a brass coupling tolerate different handling, and more force is not a substitute for finding the problem.
Inspect the washer and its seat
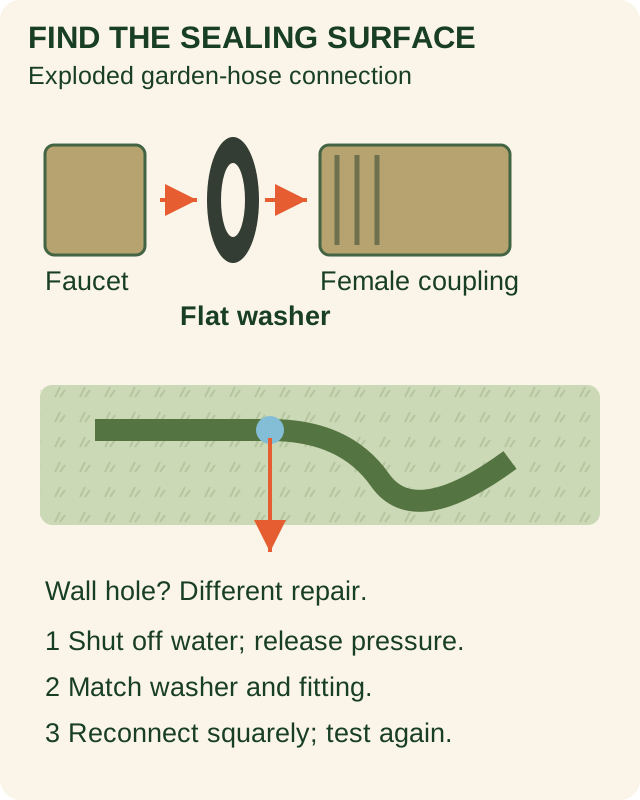
Many familiar garden-hose connections seal through a flat washer inside the female coupling. The threads bring the two surfaces together; an absent or damaged washer can leave that sealing job unfinished.
Look for a washer that is missing, folded, split, hardened, or sitting on grit. Remove loose debris carefully and inspect the sealing face for damage that a fresh washer cannot correct.
Gilmour lists its rubber hose washers for standard female garden-hose couplings. That is a useful example of a replaceable part, but it does not establish that every unusual fitting in your yard uses the same size or seal.
Match a replacement to the actual fitting and its instructions. Take the old part with you when practical, and do not stack extra washers to compensate for a damaged or mismatched connection.
Fit the washer flat in its seat before reconnecting. If it will not sit properly, investigate the obstruction or part mismatch rather than forcing the coupling closed around it.
Reconnect without cross-threading
Bring the two fittings together squarely so their threads meet naturally. Start by hand, and back off if the coupling tilts, catches immediately, or feels rough after only a partial turn.
A hose pulling sideways can make this harder than it looks. Move the hose into a gentle curve so its weight is not levering the connection away from the faucet.
Follow the fitting manufacturer's tightening instructions. A hand-tight connection with a sound washer often needs a different approach from a permanent threaded plumbing joint, so do not apply a universal tape-and-wrench routine.
If a timer or splitter is heavy, consider the support arrangement its manufacturer specifies. Hanging more accessories from one connection does not make that connection better able to resist sideways loads.
Turn the water on gradually and watch the repaired connection before reconnecting everything else. A dry result at this stage is more informative than a successful-looking test with several wet accessories still attached.
Recognize a hose-wall problem
A pinhole or split in the flexible hose calls for a different decision from a dripping coupling. Mark the damaged area, turn off the water, and inspect more than the single point that first caught your attention.
Look for crushed sections, abrasions, exposed reinforcement, and multiple cracks along a stiff length. Repairing one small opening may have limited value when the surrounding material is already failing.
A purpose-made repair coupling must match the hose's actual dimensions and construction. Check both its installation instructions and the hose maker's guidance before cutting away a damaged section.
Do not assume a repair restores every original rating or approved use. A hose used for drinking water, hot water, or another special application needs compatible equipment throughout, including any replacement coupling.
Temporary household tape can hide the opening without fixing the underlying damage. If you cannot identify a suitable repair or the hose is broadly deteriorated, replacing that hose may be the clearer choice.
Test one change at a time
Reconnect the simplest working setup first, such as faucet, hose, and open outlet. Run a brief test and inspect the repaired spot from a safe position without bending your face over a pressurized connection.
Then add the next accessory and repeat the check. This sequence lets you distinguish a repaired hose from a nozzle, timer, or splitter that introduces its own leak.
Use a dry cloth to wipe away old water before deciding that fresh moisture has appeared. Wait long enough to see a recurring drip instead of mistaking a leftover drop for failure.
Try the normal operating position as well as the convenient test position. A coupling that stays dry with the hose perfectly straight may leak when a chair leg forces it into a sharp sideways bend.
Write down which part you replaced and whether the result stayed dry. That tiny record is particularly helpful when your yard has several hoses with similar-looking connectors.
Prevent the same strain tomorrow
Route the hose around furniture and away from doors that can pinch it. Give the faucet end enough slack that reaching the far bed does not pull directly on the connection.
Use a reel or hanger suited to the hose and wind it in relaxed loops. If the hose repeatedly kinks at the same spot, change the storage or route before another split appears there.
Drain and store equipment according to its instructions when freezing conditions are possible. A hose, timer, and wall faucet can have different winter procedures, so one remembered rule may not cover the whole setup.
Keep a few correctly matched spare washers together with the fitting information. A labeled envelope is more useful than a mixed handful of old seals whose size and condition you cannot identify.
Finally, check for drips during ordinary watering rather than waiting for a large puddle. A quick look at a familiar connection is often enough to catch a small, understandable problem while it is still easy to investigate.
Sources & further reading
Exact documentation checked October 15, 2026. Original examples and illustrations; no hands-on product testing or professional certification claimed.
- Rubber Hose Washers — GilmourStandard female hose-coupling washer replacement and compatible repair scope